Saturday, August 27, 2011

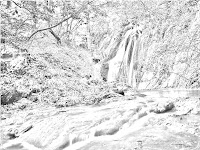
How To Make A Pencil Sketch [Photoshop]


========>>>>


As I am newly starting photoshop tutorial I will go with basic stuffs first. Let start with this tutorial. In thsi tutorial You will see how to convert a normal Image into a sketch Image. As you can see the example above.
Take any photo and follow this step and you will be able to convert that photo into a sketch. as if you had drawn with your hands :P.
Anyways lets get start now there are few basic features of photoshop that we will use today :
  • Layers
  • Blending Mode
  • Image Adjustment Layers
  • Filters

So lets get starterd now. 

  • Open your image in photoshop for which you want an sketch look.  Now you need to desaturate the image which will make the image black and white  [Image > Adjustments > Desaturate ] or simply press [ ctrl + shift + u ]


  • Make a copy of the layer now by selecting the duplicate layer option. [ Right click on the layer > Duplicate layer ]
  • After doing that, we need to invert the color of this layer. That is done by [ Image > Adjustments > Invert ] or [ ctrl + I ]
  • Now go to the blending layer option and select the color dodge option

  • Next step is to go to give the image a blur (Gaussian) which will work in favor of making the image visible. [ Filter > Blur > Gaussian Blur ]  Anything from between 5px to 40px would work well depending upon the image type. Ideally use around 15 to 25.


And wooohhh You have your own Pencil  sketch !!!


Image and video hosting by TinyPic

Thursday, August 25, 2011

Create A Cool About Me Batch For Your Blog !

Hi guys!
In This tutorial I will show you how to  Create a Cool About me badge. This is really good and gives a great look to your blog. So here what you got to do to get this kind of badge.
Visit this website :  Badge Maker.


Upload a picture, write about yourself or your blog, and add a footer text. That's it !
Your new profile widget picture will be ready.

Wednesday, August 24, 2011

Adding Social Bookmarking Buttons To Your Post !!


Howdy Ma Fellow readers.


This is a new tutorial in which I will show you how to add Social Bookmarking Buttons to Your Post.
Now everyone wants to share their article Right? And some of our readers really share them with other people. To make it easier for them lets Add Social bookmarking buttons to our site.
Its very simple just follow 2 Steps and you are done. So here are the steps.
Go to your blogger account, Navigate to layout >> Edit Html, And make sure to check Expand Widget Templates,
And find the following code.
 

 <data:post.body/>
And exactly after it, paste the next code,

<div align='left'>
<span class='post-icons'>


<!-- Widget Title , Share This Start, Remove Or Leave--><p align='left'>
<img alt='' border='0' id='BLOGGER_PHOTO_ID_5441163760466269298' src='https://blogger.googleusercontent.com/img/b/R29vZ2xl/AVvXsEj5eDpaD_Jj_lSCGD2FLhHQf-9i6BtK1htb_qAB9bwwjOHzCyS1DRPaiPBRnOCKSGHLzi56jFXj_Tw94ZM34QEyR1tUKWu5URMBdCrbzxh3L7lsN9pKFqqha8mbE-sl38FythT_mh10JTOi/s400/share-this.png'/></p><!-- Widget Title , Share This Start, Remove Or Leave-->


<!-- Stumbleupon Button Start, Remove Or leave -->
<a expr:href='&quot;http://www.stumbleupon.com/refer.php?url=&quot; + data:post.url + &quot;&amp;title=&quot; + data:post.title' target='_blank' title='Stumble This'><img alt='Stumble This' border='0' class='icon-action' src='https://blogger.googleusercontent.com/img/b/R29vZ2xl/AVvXsEiqyPNtJJhXuv35NtLz1kNeT8Bp-pUM7EGrSDl4juFPiFr9YyGSi6ifpMz_e_UAE_4eqKx2BA572OUcKopgaR_wgHLWh60f_KUiVIv34vEkgHoZnq7zcXCFRhmkcWSGmjPWysY99xibVOM/s200/stumbleupon.png'/></a>
<!-- Stumbleupon Button End, Remove Or leave -->


<!-- Technorati Button Start, Remove Or leave -->
<a expr:href='&quot;http://www.technorati.com/faves?add=&quot; + data:post.url' target='_blank' title='Fav This With Technorati'><img alt='Fav This With Technorati' border='0' class='icon-action' src='https://blogger.googleusercontent.com/img/b/R29vZ2xl/AVvXsEhrWYZIyZtXZUWNgrLQKgiEyZzSZTlbbfCCGymR7i52j_9MVwH2M0b5OC02KHarjEYNURgO_c20duOzo7VZgfOt1Zp4lY583a4vp2hjcBjmIa4d0KwSDHO6jr0HnI14F_UBhKIoQg0xKn4/s200/technorati.png'/></a>
<!-- Technorati Button End, Remove Or leave -->


<!-- Delicious Button Start, Remove Or leave -->
<a expr:href='&quot;http://del.icio.us/post?url=&quot; + data:post.url + &quot;&amp;title=&quot; + data:post.title' target='_blank' title='Add To Del.icio.us'><img alt='Add To Del.icio.us' border='0' class='icon-action' src='https://blogger.googleusercontent.com/img/b/R29vZ2xl/AVvXsEgKIX6i6seHEsbE9y0GLrj2cUkGRk3tjH_xcYTpALOrkp1jR-ub1Bi7HEZIqd9XgKI_PbUM8k5gRZOP6imhdWR3Q-94F7l9PF13WXAzmxpft6bgS9JxXWg6aV4THStfmuiciJ7jmLz3B6I/s200/delicious.png'/></a>
<!-- Delicious Button End, Remove Or leave -->


<!-- Digg Button Start, Remove Or leave -->
<a expr:href='&quot;http://digg.com/submit?phase=2&amp;url=&quot; + data:post.url + &quot;&amp;title=&quot; + data:post.title' target='_blank' title='Digg This'><img alt='Digg This' border='0' class='icon-action' src='https://blogger.googleusercontent.com/img/b/R29vZ2xl/AVvXsEhpuMHRPtLm-NOtutuHv-jCn8piPq7Y7R8g0-b7UKvsVmtZWZlZRRD7FPkRT2DNyh5pn9jw9OKruAz1UtARaGC6WpFumSkhFL7LZzvinesUtrnBx3bNkQVwO-DEJg-o9lf6NECi7C_vQBQ/s200/digg.png'/></a>
<!-- Digg Button End, Remove Or leave -->


<!-- Reddit Button Start, Remove Or leave -->
<a expr:href='&quot;http://reddit.com/submit?url=&quot; + data:post.url + &quot;&amp;title=&quot; + data:post.title' target='_blank' title='Add To Reddit'><img alt='Add To Reddit' border='0' class='icon-action' src='https://blogger.googleusercontent.com/img/b/R29vZ2xl/AVvXsEgvm_j5ZNiziShkEJn2Yt50Sl0licMFJbGqtjl-RPRnVs5-sYw5Dk0SzzOTulA4IGqiqXZIo2MCCfGXA4GzUoRjK0Wp9IQt2VTFX3wql1MwIHgu66SXSRSnq7SVLC3ckiRqgzp9Bc127_8/s200/reddit.png'/></a>
<!-- Reddit Button End, Remove Or leave -->


<!-- FaceBook Button Start, Remove Or leave -->
<a expr:href='&quot;http://www.facebook.com/sharer.php?u=&quot; + data:post.url + &quot;&amp;title=&quot; + data:post.title' target='_blank' title='Add To Facebook'><img alt='Add To Facebook' border='0' class='icon-action' src='https://blogger.googleusercontent.com/img/b/R29vZ2xl/AVvXsEgCPitkHofwVesYuNMy-XcJkchrW1apjuRP81ScwpDGSeWBW8Yu8UskfeJdWyO3gITP9TC8He2Qlfi-nOlcFSY9vIp1og7eTRBrUixkC759hytsdl2oajynXrTo07j43AvN4yu_6Ha6xT8/s200/facebook.png'/></a>
<!-- FaceBook Button End, Remove Or leave -->


<!-- Yahoo Button Start, Remove Or leave -->
<a expr:href='&quot;http://myweb2.search.yahoo.com/myresults/bookmarklet?t=&quot; + data:post.url + &quot;&amp;title=&quot; + data:post.title' target='_blank' title='Add To Yahoo'><img alt='Add To Yahoo' border='0' class='icon-action' src='https://blogger.googleusercontent.com/img/b/R29vZ2xl/AVvXsEiqxCELAqug1xK2n3xDyLA6cmXauAKyO9xYQOb3jUFedNvEZRaxZfsCky6toqhIK0-3WNPPfbeO05M88K_MLkhdUv0YC1TZw33el3rteeMjTMUzL2DRrqPiW6jJUnqR7k_pfQK5_xciBNQ/s200/yahoo.png'/></a>
<!-- Yahoo Button End, Remove Or leave -->

<!-- Twitter Button Start, Remove Or leave -->
<script charset='utf-8' src='http://bit.ly/javascript-api.js?version=latest&amp;login=tweettrackjs&amp;apiKey=R_7e9987b2fd13d7e4e881f9cbb168f523' type='text/javascript'/>
<script charset='utf-8' src='http://s.bit.ly/TweetAndTrack.js?v=1.01' type='text/javascript'/>
<a expr:onclick='&quot;return TweetAndTrack.open(this, \&quot;&quot; + data:post.url + &quot;\&quot;);&quot;' href='#'>
<span style='display:none;'>I&#39;m reading: <data:post.title/></span><img alt='Add To Yahoo' border='0' class='icon-action' src='http://www.cbc.ca/news/yourvoice/assets/images/yourvoice-twitter.png'/></a>
<!-- Twitter Button End, Remove Or leave -->

</span>
</div>
Now click on Save Template. 


Now Adding Part is Done Do you want to Customize it?

Then Do the following :


Customizing the Widget :


You can delete or rearrange the buttons in this widget, and you can remove the Share this Big sign or leave it.
Lets see how.
In the above code you’ll notice that there are lines in red and blue colors.
You can change the Image also of particular Bookmark if you want.


Find you own Icon and change the
Red image location to the location of your image and Enjoy
src='https://blogger.googleusercontent.com/img/b/R29vZ2xl/AVvXsEiqxCELAqug1xK2n3xDyLA6cmXauAKyO9xYQOb3jUFedNvEZRaxZfsCky6toqhIK0-3WNPPfbeO05M88K_MLkhdUv0YC1TZw33el3rteeMjTMUzL2DRrqPiW6jJUnqR7k_pfQK5_xciBNQ/s200/yahoo.png'/
This is just am image example of yahoo you can change it for any Icon.
If you still have any problem feel Free to contact me


Credits
Allblogtools

Adding Related Post Widget To Your BlogPost !!


So this is a new tutorial Again. You guys must be thinking I have gone mad writing again and again This many tutorials, But to tell you the truth am getting obsessed with this Blogging.

Now in this Tutorial I will Help you guys to install Related Post widget. Why should you have this widget?
This widget will help you Drive more traffic and will help your Readers stay on your site for longer.
Its Easy like all The other Tutorials. just follow Steps and you are done.


Here are the Steps :

  • Log in to your blogger account.
  • Go to Design --> Edit HTML
  • Check in the "Expand Widget Templates" box
  • Copy the code below, and paste it above </head> 

<!--Related Posts with thumbnails Scripts and Styles Start-->
<b:if cond='data:blog.pageType == &quot;item&quot;'>
<style type='text/css'>
#related-posts {
float:center;
text-transform:none;
height:100%;
min-height:100%;
padding-top:5px;
padding-left:85px;
}

#related-posts h2{
font-size: 1.6em;
font-weight: bold;
color: #585858;
font-family: Georgia, &#8220;Times New Roman&#8221;, Times, serif;
margin-bottom: 0.75em;
margin-top: 0em;
padding-top: 0em;
}
#related-posts a{
color:#8A0000;
}
#related-posts a:hover{
color:#000000;
}

#related-posts a:hover {
background-color:#D91F00;
}
</style>
<script src='http://blogergadgets.googlecode.com/files/relatedthumbs21.js' type='text/javascript'/>
</b:if>
<!--Related Posts with thumbnails Scripts and Styles End-->
Now if you want to make any changes here like changing the color of the font the you have to change this
#related-posts a{
color:#8A0000;
Changing the hover color (when we take our mouse over the post) then change this

#related-posts a:hover {
background-color:#D91F00

And If you want to Shift the Related post from left to right or center or adjust according to your like then change this

padding-left:85px;
Now there is Still some more (What you thought its done :P).

  •  Then find this code


  • <div class='post-footer-line post-footer-line-1'>
    If you cant find the above code then find this one

    <p class='post-footer-line post-footer-line-1'>


  •  After that copy the code below, and paste under one of the code above 


  • <!-- Related Posts with Thumbnails Code Start-->
    <b:if cond='data:blog.pageType == &quot;item&quot;'>
    <div id='related-posts'>
    <b:loop values='data:post.labels' var='label'>
    <b:if cond='data:label.isLast != &quot;true&quot;'>
    </b:if>
    <b:if cond='data:blog.pageType == &quot;item&quot;'>
    <script expr:src='&quot;/feeds/posts/default/-/&quot; + data:label.name + &quot;?alt=json-in-script&amp;callback=related_results_labels_thumbs&amp;max-results=6&quot;' type='text/javascript'/></b:if></b:loop>
    <script type='text/javascript'>
    var currentposturl=&quot;<data:post.url/>&quot;;
    var maxresults=5;
    var relatedpoststitle="Related Posts";
    removeRelatedDuplicates_thumbs();
    printRelatedLabels_thumbs();
    </script>
    </div><div style='clear:both'/>
    </b:if>
    <!-- Related Posts with Thumbnails Code End-->
    Customize :
    var maxresults=5; is the maximum result of the related posts that shown in every post
    var relatedpoststitle=
    "Related Posts"; is the title of the related posts


  • If you've finished with your settings, just click  Save Template. 


  •  What You Still Want more. Its done already :)
     More Coming Soon Enjoy

    Utilize Your Blogger Footer By Three Column Footer !!


    Hi guys This trick will Help you make Three Column Footer at the Bottom of your Blog/Site to help you utilize that space. And it really makes your blog look cool and even saves quite good amount of space.
    You might have seen many blogs with such footer including mine. you also want to put this right? the go ahead and Try it.


    And remember before doing anything with your template please back up your template.


    Here are the steps you should follow :


    • Log in to your blogger account.
    • Go to Design --> Edit HTML
    • Copy the code below, and paste above ]]></b:skin> 


    /* -----   LOWER SECTION   ----- */
    #lower {
           margin:auto;
           padding: 0px 0px 10px 0px;
           width: 100%;
           background:#333434;
    } 
    #lower-wrapper {
           margin:auto;
           padding: 20px 0px 20px 0px;
           width: 960px;
    }
    #lowerbar-wrapper {
         border:1px solid #DEDEDE;
           background:#fff;
           float: left;
           margin: 0px 5px auto;
           padding-bottom: 20px;
           width: 32%;
           text-align: justify;
           font-size:100%;
           line-height: 1.6em;
           word-wrap: break-word; 
           overflow: hidden;
    }
           .lowerbar {margin: 0; padding: 0;}
           .lowerbar .widget {margin: 0; padding: 10px 20px 0px 20px;}
    .lowerbar h2 {
          margin: 0px 0px 10px 0px;
           padding: 3px 0px 3px 0px;
           text-align: left;
           color:#0084ce;
            text-transform:uppercase;
          font: bold 14px Arial, Tahoma, Verdana;
           border-bottom:3px solid #0084ce;
    }
    .lowerbar ul {
          margin: 0px 0px 0px 0px;
          padding: 0px 0px 0px 0px;
          list-style-type: none;
    }
    .lowerbar li {
          margin: 0px 0px 2px 0px;
          padding: 0px 0px 1px 0px;
          border-bottom: 1px dotted #ccc;
    }
    => Change the background color of this widget
    => Adjust this width value in accordance with the width of your blog.
    => That are the background colour and width of the three columns where the widgets are added.
    => Change the color of the title
    => Change the font size and family
    => Change the thickness, style and colour of the border that appears at the bottom of the title
    => Change the size, style and colour of the border that appears below links.


    • Then copy the code below, and paste above </body> 

    <div id='lower'>
    <div id='lower-wrapper'>
    <div id='lowerbar-wrapper'>
    <b:section class='lowerbar' id='lowerbar1' preferred='yes'>
    </b:section>
    </div>
    <div id='lowerbar-wrapper'>
    <b:section class='lowerbar' id='lowerbar2' preferred='yes'>
    </b:section>
    </div>
    <div id='lowerbar-wrapper'>
    <b:section class='lowerbar' id='lowerbar3' preferred='yes'>
    </b:section>
    </div>
    <div style='clear: both;'/>
    </div> </div>
    • Save your template now. Then check in the Design --> Page Elements 

    Credits
    Full Blog Tricks

    Find me on Bloggers

    Hatim - Find me on Bloggers.com